Apple iOS SDK Tap to Pay
This documentation provides an overview and details for the core components of the YavinSDK, focusing on the YavinManager class and its related types. The SDK handles authentication, payment processing, and device eligibility for Tap to Pay functionality.
At a glance
| Distribution | Swift Package Manager |
| Authentication | Standalone login flow (merchant credentials) or Yavin API key |
| Naming convention | Swift API, amounts as integers in cents |
| Current version | v1.7.3 |
| Result delivery | Synchronous: completion handlers on each SDK call |
Overview
The SDK provides solutions for:
- User Authentication: Handling login using either the Yavin API key or email/password.
- Payment Processing: Initiating and completing payment requests.
- Device Eligibility: Verifying that the device meets the necessary requirements (e.g., iOS version, hardware specifications, passcode).
- User Interface: Presenting authentication and payment views with a full-screen modal presentation.
- Error Handling: Managing and propagating errors related to authentication, payment, and device eligibility.
Requirements
- Hardware: iPhone XS or newer (for Tap to Pay)
- Device OS: iOS 17+ (for Tap to Pay)
- Security: Device passcode must be set
Installation
Add dependency
Add the Swift package dependency in your Xcode project:
Project -> Package Dependencies -> Click + icon
In the search bar add the dependency depending on your usage:
- PROD: https://gitlab.com/yavin-public/ios-sdk-spm.git
- SANDBOX: https://gitlab.com/yavin-public/ios-sdk-spm-sandbox.git
In SANDBOX environment, you need a Sandbox iCloud account.
Ask for the Tap to Pay on iPhone capability to be added to your Apple Account.
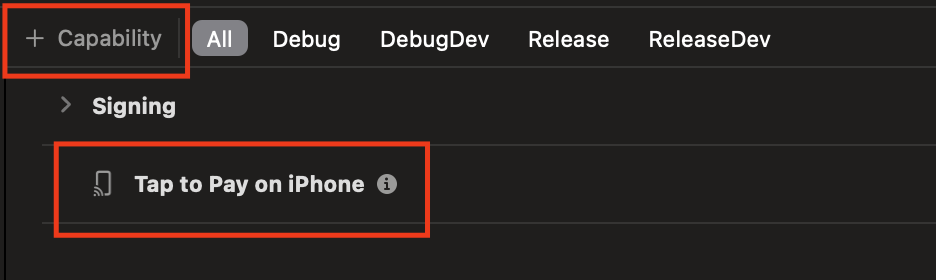
Demo application
You can find a demo application on this repo:
YavinManager usage
The YavinManager class is the central point of interaction for the SDK. It follows a singleton pattern and encapsulates the Yavin authentication and payment features.
Import the SDK
In order to start, first add the YavinSDK import:
import YavinSDKAccess the shared instance
Access the features using the YavinManager.shared instance:
let yavinSdk = YavinManager.sharedSwiftUI: get the UIViewController
If you’re using SwiftUI, some API methods require a UIViewController in order to work. The SDK provides a helper class ViewControllerAccessor to access the UIViewController from your SwiftUI View.
struct  MySwiftUIView: View {
		@State  private var currentViewController: UIViewController?
		var  body: some  View {
				VStack {
						// Use `currentViewController` to launch Yavin features
				}
				.background(
						ViewControllerAccessor { vc in
								self.currentViewController = vc
			      }
		    )
		}
}Authentication
There are two ways to log in the SDK:
- Standalone Login Flow
- Using Yavin API key
Standalone Login Flow
As the cash register may not have the Yavin API key for login in, we provide a standalone flow.
The standalone flow allows a cash register to provides merchants a fluid experience to enable Tap to Pay on iPhone.
It follows 3 steps:
- Display a “publicity” screen
- Merchant logs in using Yavin’s credentials
- Acceptation of Yavin’s terms regarding Tap to Pay
Here’s how it looks:
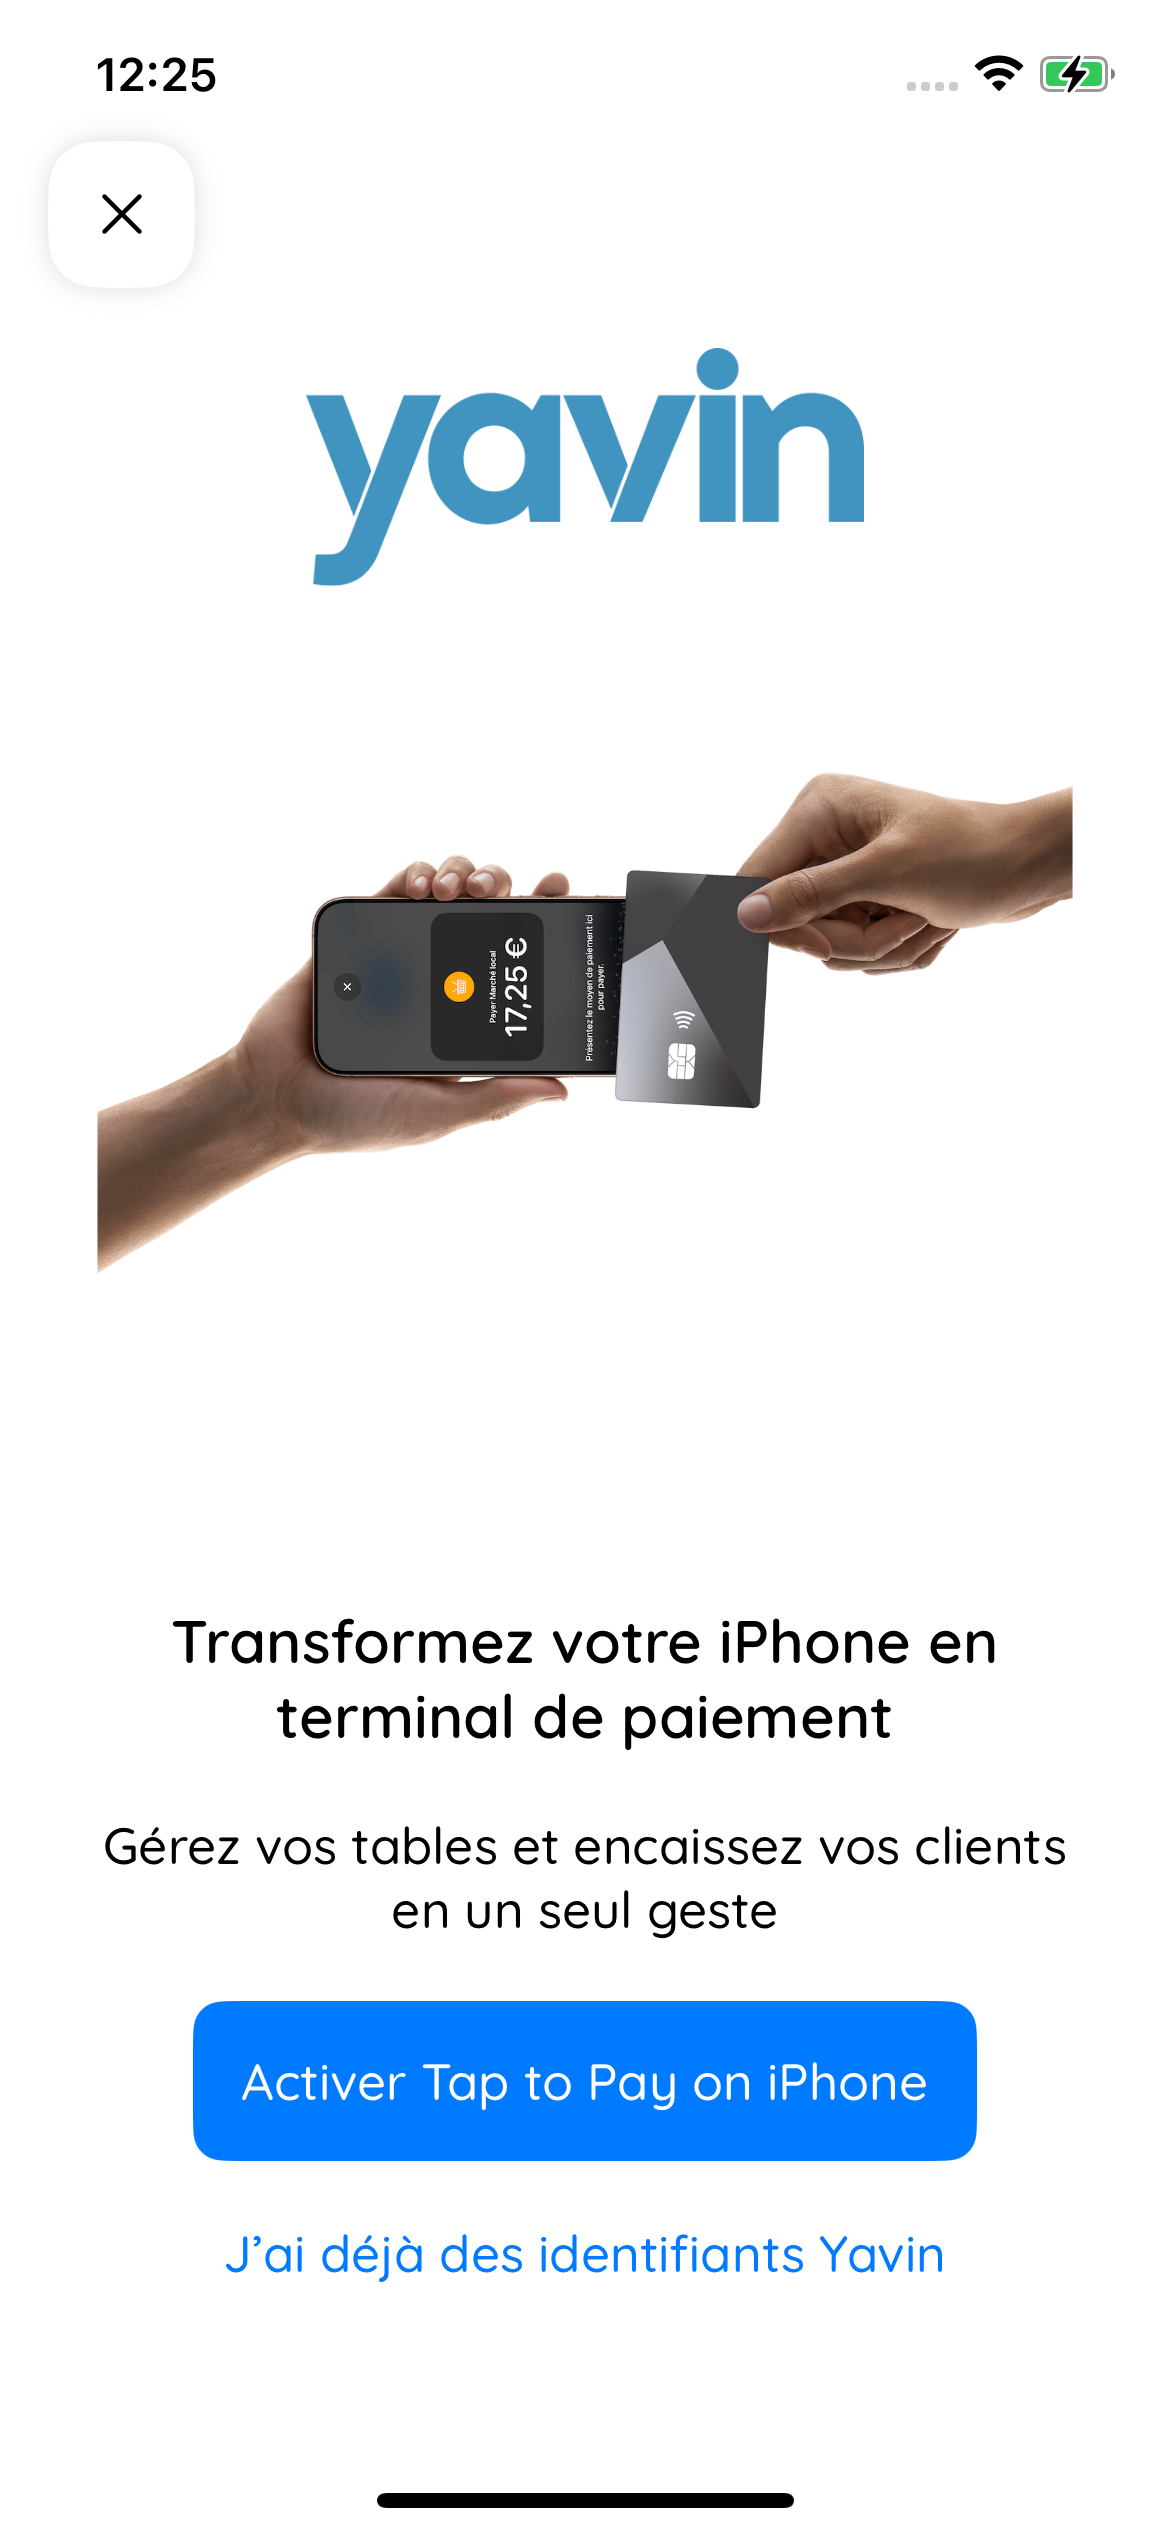
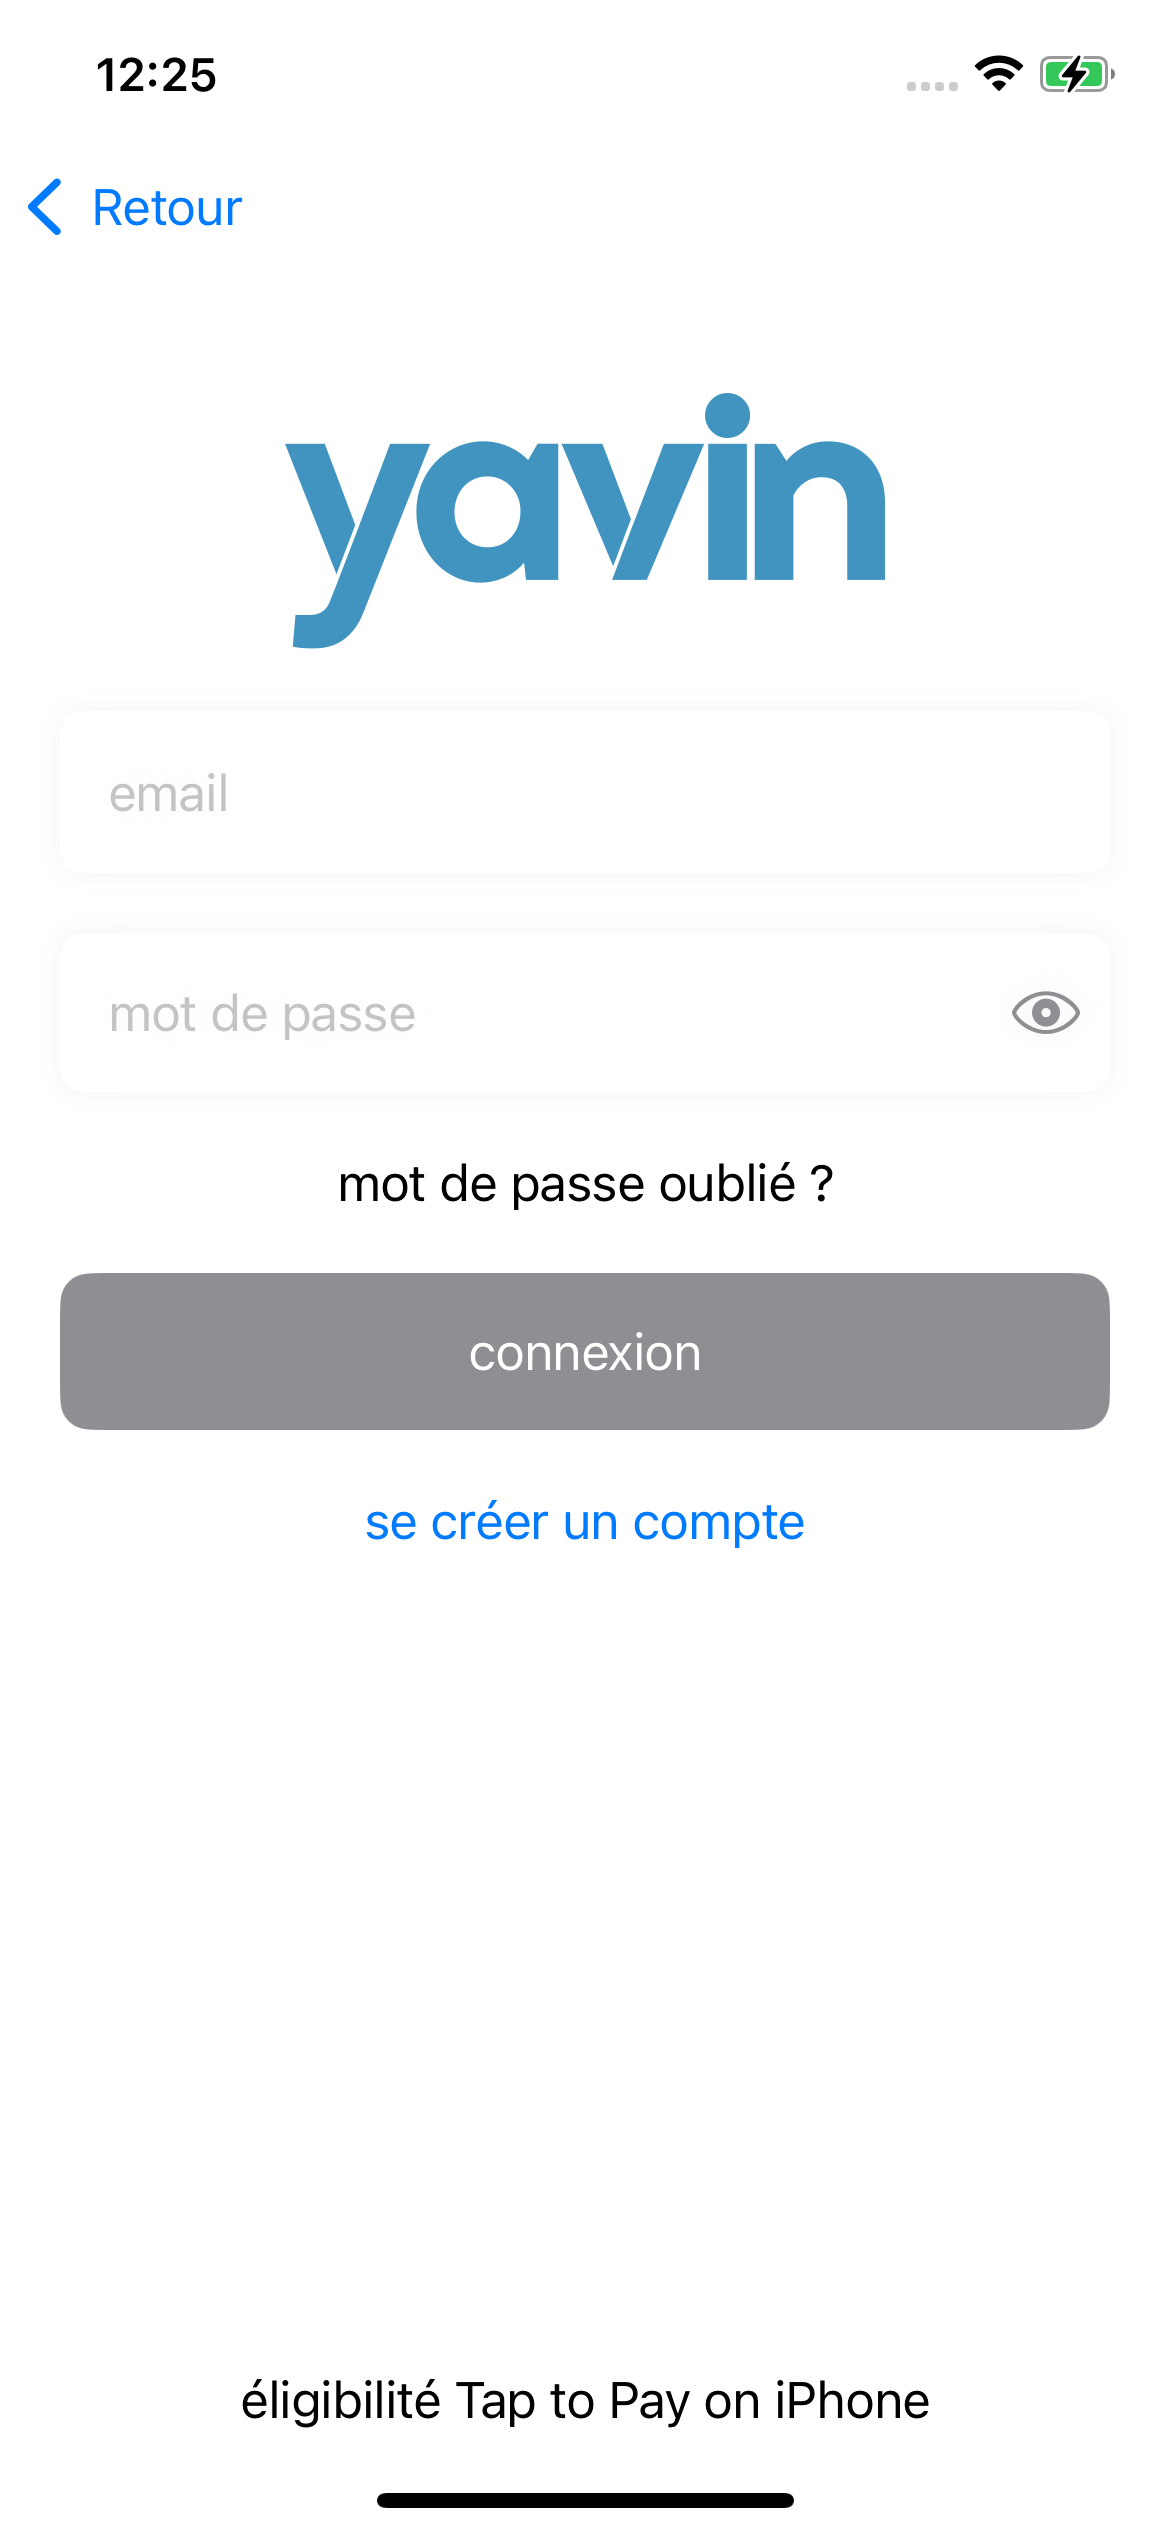
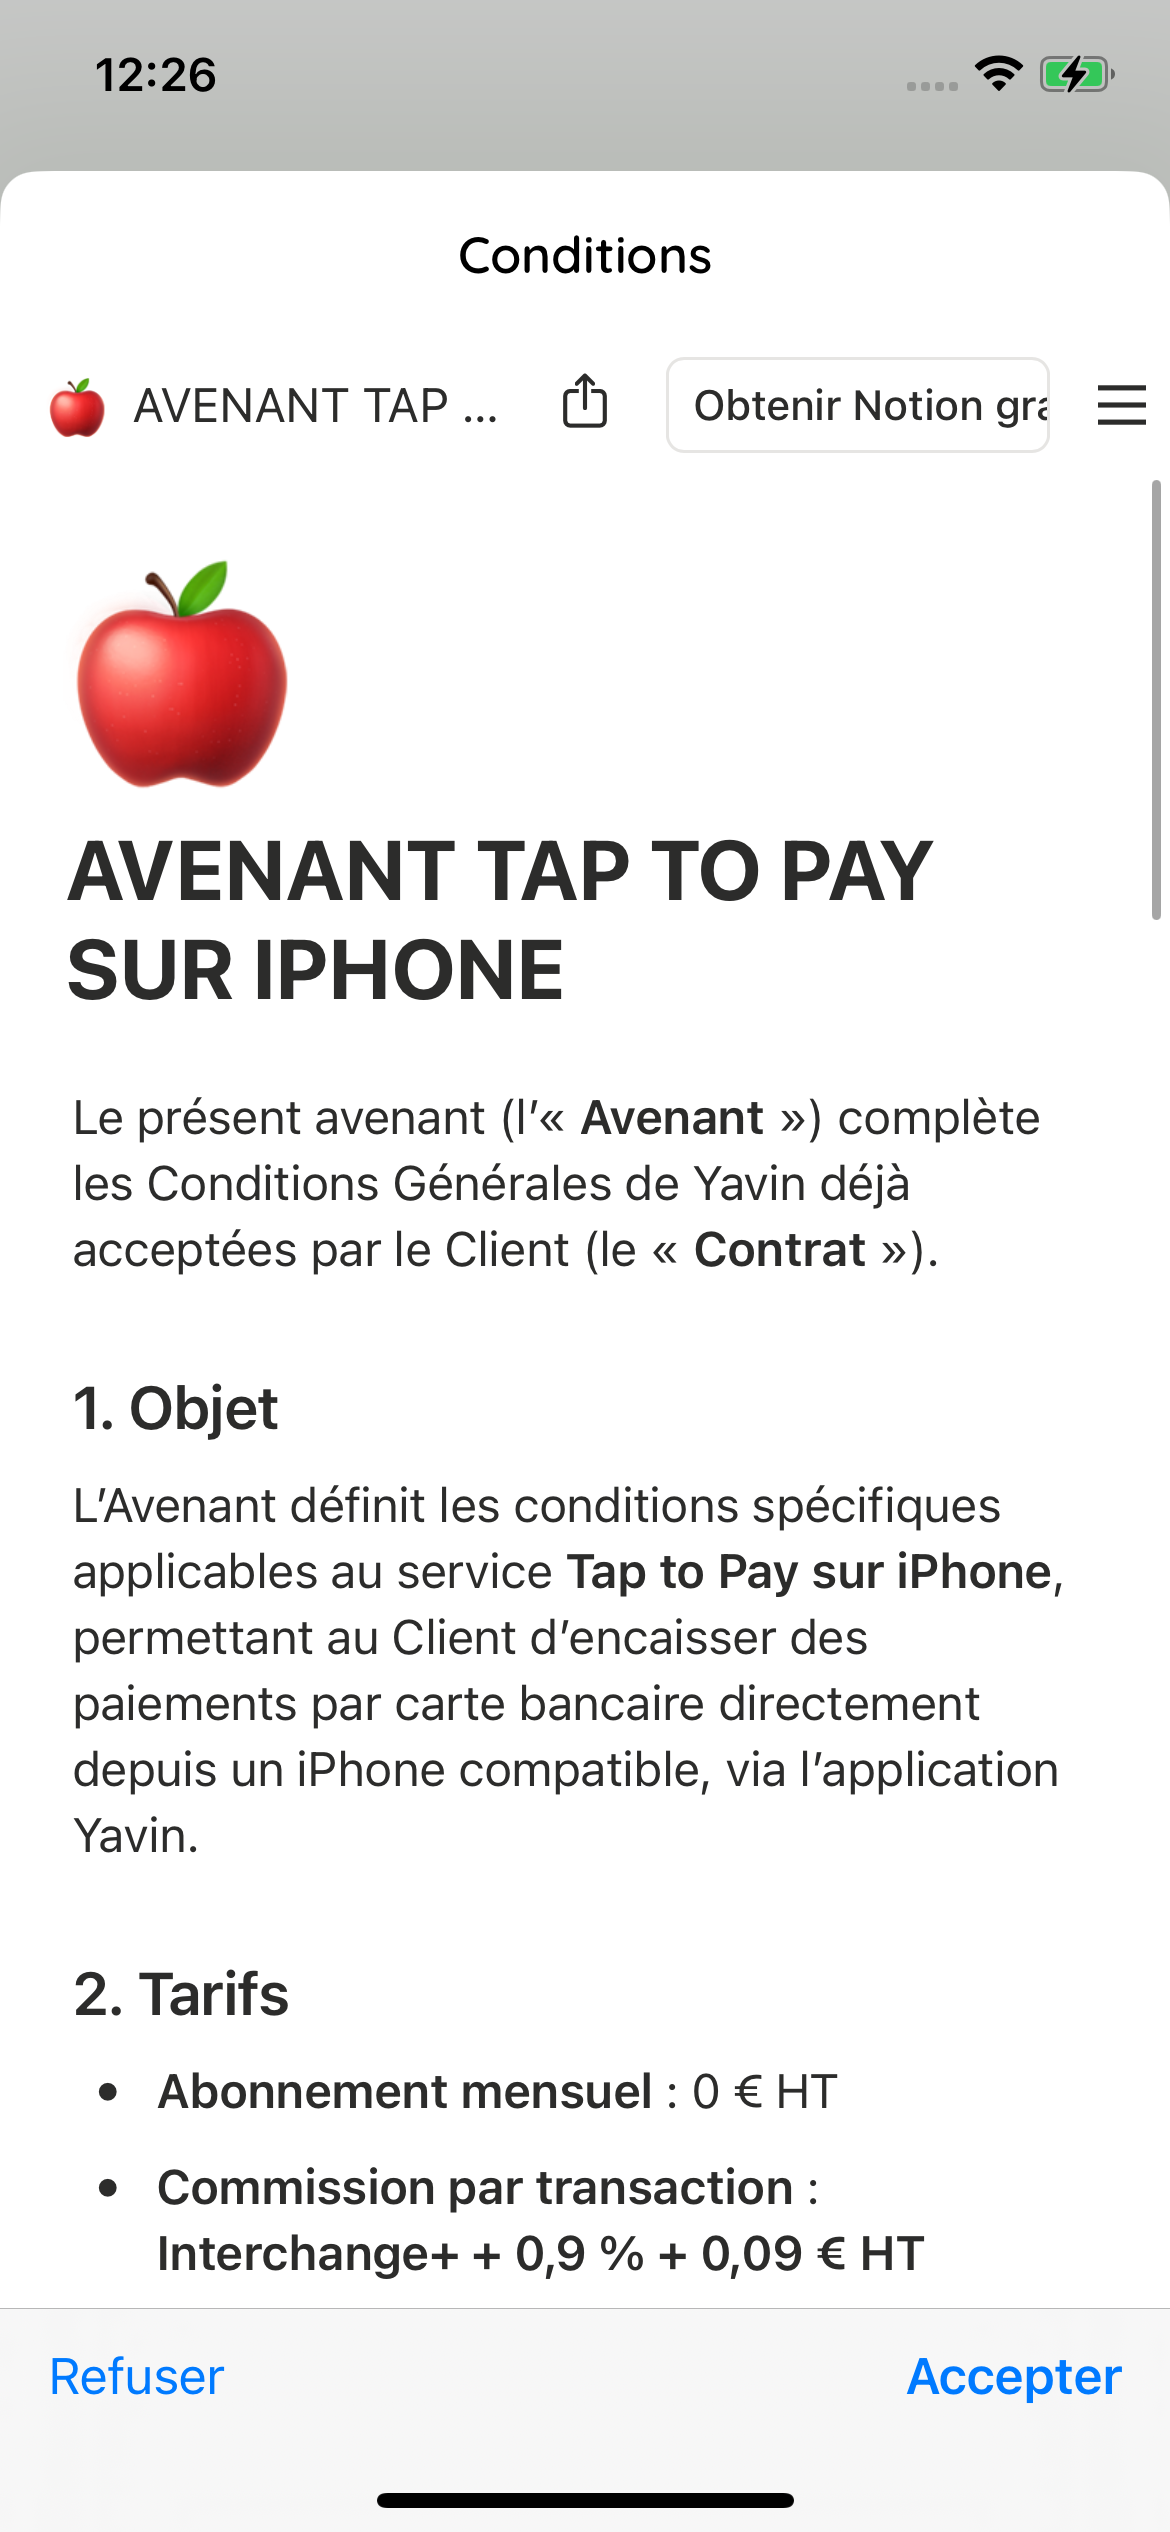
Once the terms have been accepted by the merchant, the SDK logs in, and on success payments can be processed.
The cash register can detect the SDK authentication using YavinManager.shared.isLoggedIn() (see more below)
Recommendations:
The cash register should display a button “Activate Tap to Pay on iPhone” if the SDK is not logged in. Upon click of the button, the cash register should call YavinManager.shared.showTapToPayActivationFlow() . This will show the “publicity” screen seen above.
When login is successful, cash register may hide the button, because at this point the Yavin SDK is logged in with the merchant and is able to process payments.
If the cash register can switch between several points of sale, it is cash register responsibility to logout and re-login the Yavin SDK before processing payments for the new selected point of sale.
YavinManager.shared.showTapToPayActivationFlow(
	viewController: currentViewController,
	onDismiss: {},
	returnApiKey: false,
  onCompletion: { result in
	  switch result {
				case .success(let loginResult):
					if loginResult.success {
							// SDK is logged in, payments can be processed
					}
				case .failure(let error):
					// handle error
			}
	}
)Login using Yavin API Key
Partners may use this method if they are already handling the Yavin API key, otherwise we recommend using the Standalone Flow.
let request = YavinLoginRequest(
		yavinApiKey: "your_yavin_api_key"
)

YavinManager.shared.login(
		viewController: self,
		request: request
) { result in
		switch result {
		case .success(let loginResult):
				if loginResult.success {
            // Handle successful login
        }
		case .failure(let error):
				// Handle error
		}
}Refresh Login
This method is used to refresh the token the SDK is using internally for enabling payment processing.
You must be logged in in order to use this method.
YavinManager.shared.refreshLogin(viewController: self) { result in
		switch result {
		case .success(let loginResult):
				if loginResult.success {
            // Handle successful login
        }
		case .failure(let error):
				// Handle error
		}
}Check if logged in
// Boolean check
let isLoggedIn = YavinManager.shared.isLoggedIn()

// Publisher for reactive updates
var cancellables = Set<AnyCancellable>()
YavinManager.shared.isLoggedIn()
    .sink { isLoggedIn in
        // Update UI
    }
.store(in: &cancellables)Logout
This method clears all data and set YavinManager.shared.isLoggedIn to false. You will need to login again in order to take payments.
YavinManager.shared.logout()Payment
Once the SDK is logged in, payments are launched with a single call. Amounts are always integers in cents.
Launch payment API
let paymentRequest = YavinPaymentRequest(
		amount: 1000, // In cents: 10€
		transactionType: .debit,
		reference: "my reference"
)

YavinManager.shared.launchPaymentRequest(
		viewController: self,
		request: paymentRequest
) { result in
		switch result {
		case .success(let paymentResult):
				// Handle processed payment
        print("payment with id \(paymentResult.transactionId) processed")
		case .failure(let error):
				// Handle payment error
			}
}Cancel a payment by API
Set transactionType to reversal. When the payment is being processed, a pin code is required to confirm the cancellation.
The pin code is available on your company page in the Yavin backoffice, under Company Details > Pin code.
let paymentRequest = YavinPaymentRequest(
		amount: 1000, // In cents: 10€
		transactionType: .reversal
)

YavinManager.shared.launchPaymentRequest(
		viewController: self,
		request: paymentRequest
) { result in
		switch result {
		case .success(let paymentResult):
				// Handle processed payment
        print("payment with id \(paymentResult.transactionId) processed")
		case .failure(let error):
				// Handle payment error
			}
}Additional Features
Tips activation
In order to propose tips to your customer, use the following function:
YavinManager.shared.enableTipsScreen(enable: true)Check eligibility programmatically
if YavinManager.shared.isDeviceEligible() {
    // Device supports Tap to Pay
} else {
    // Device doesn't meet requirements
}
Navigate to EligibilityView
In your app, you can navigate to YavinManager.shared.YavinEligibilityView() in order to see device eligibility in a standalone way.
Example:
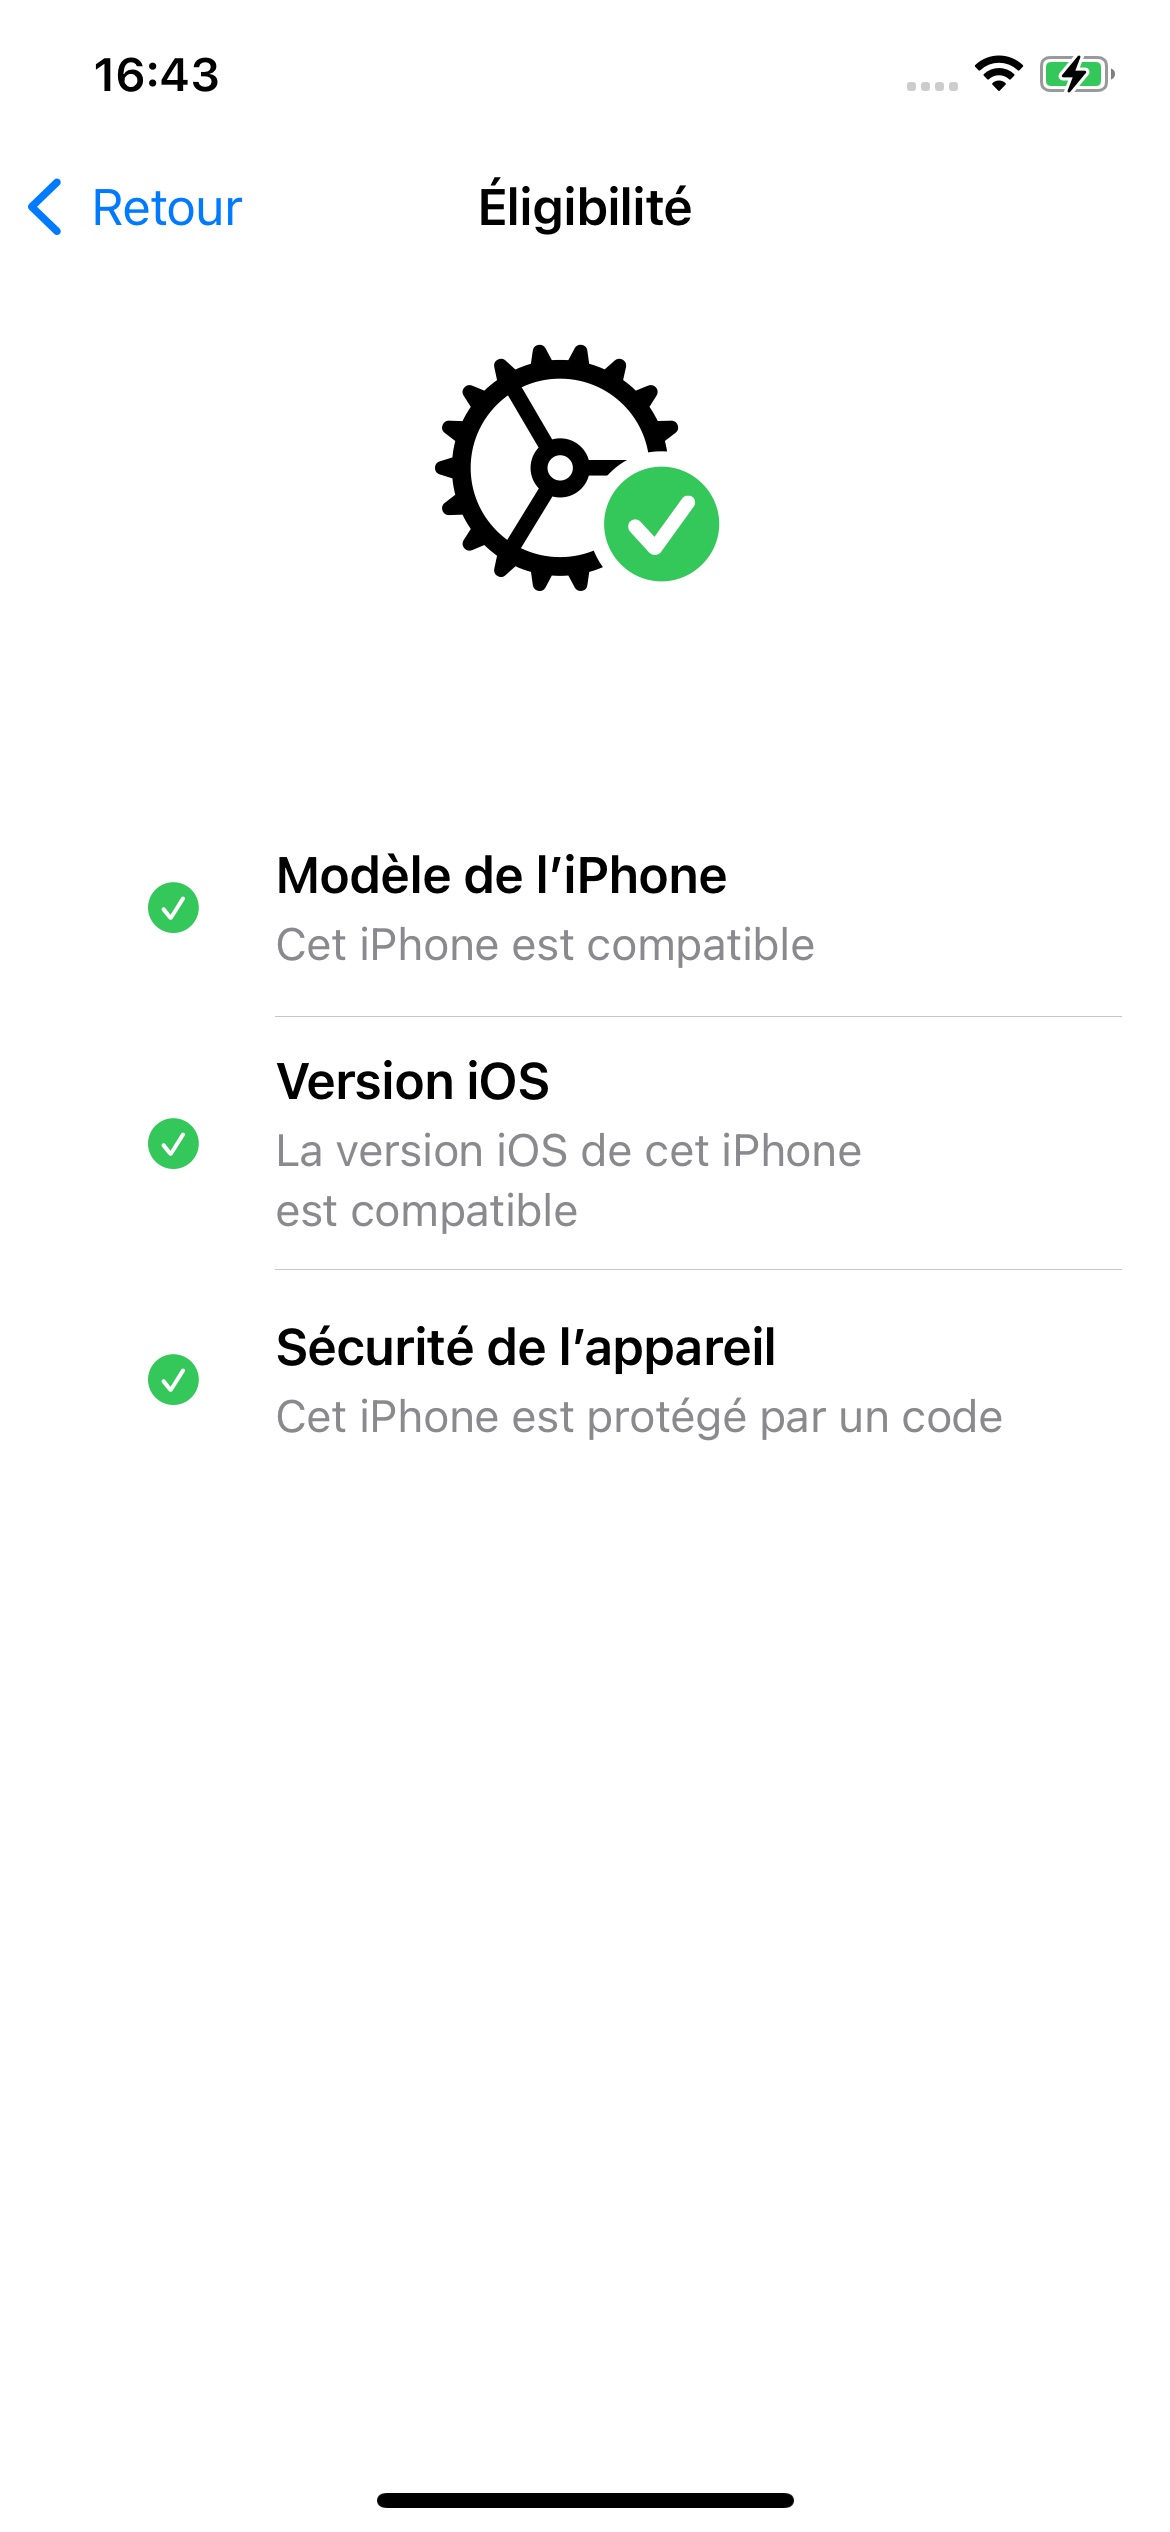
NavigationLink(destination: YavinManager.shared.YavinEligibilityView()) {
    VStack(alignment: .leading) {
        Text("Eligibility")
            .foregroundStyle(.black)
        Text("SoftPos requirements")
            .font(.footnote)
            .foregroundStyle(.gray)
    }
}Tap to Pay Tutorial Presentation
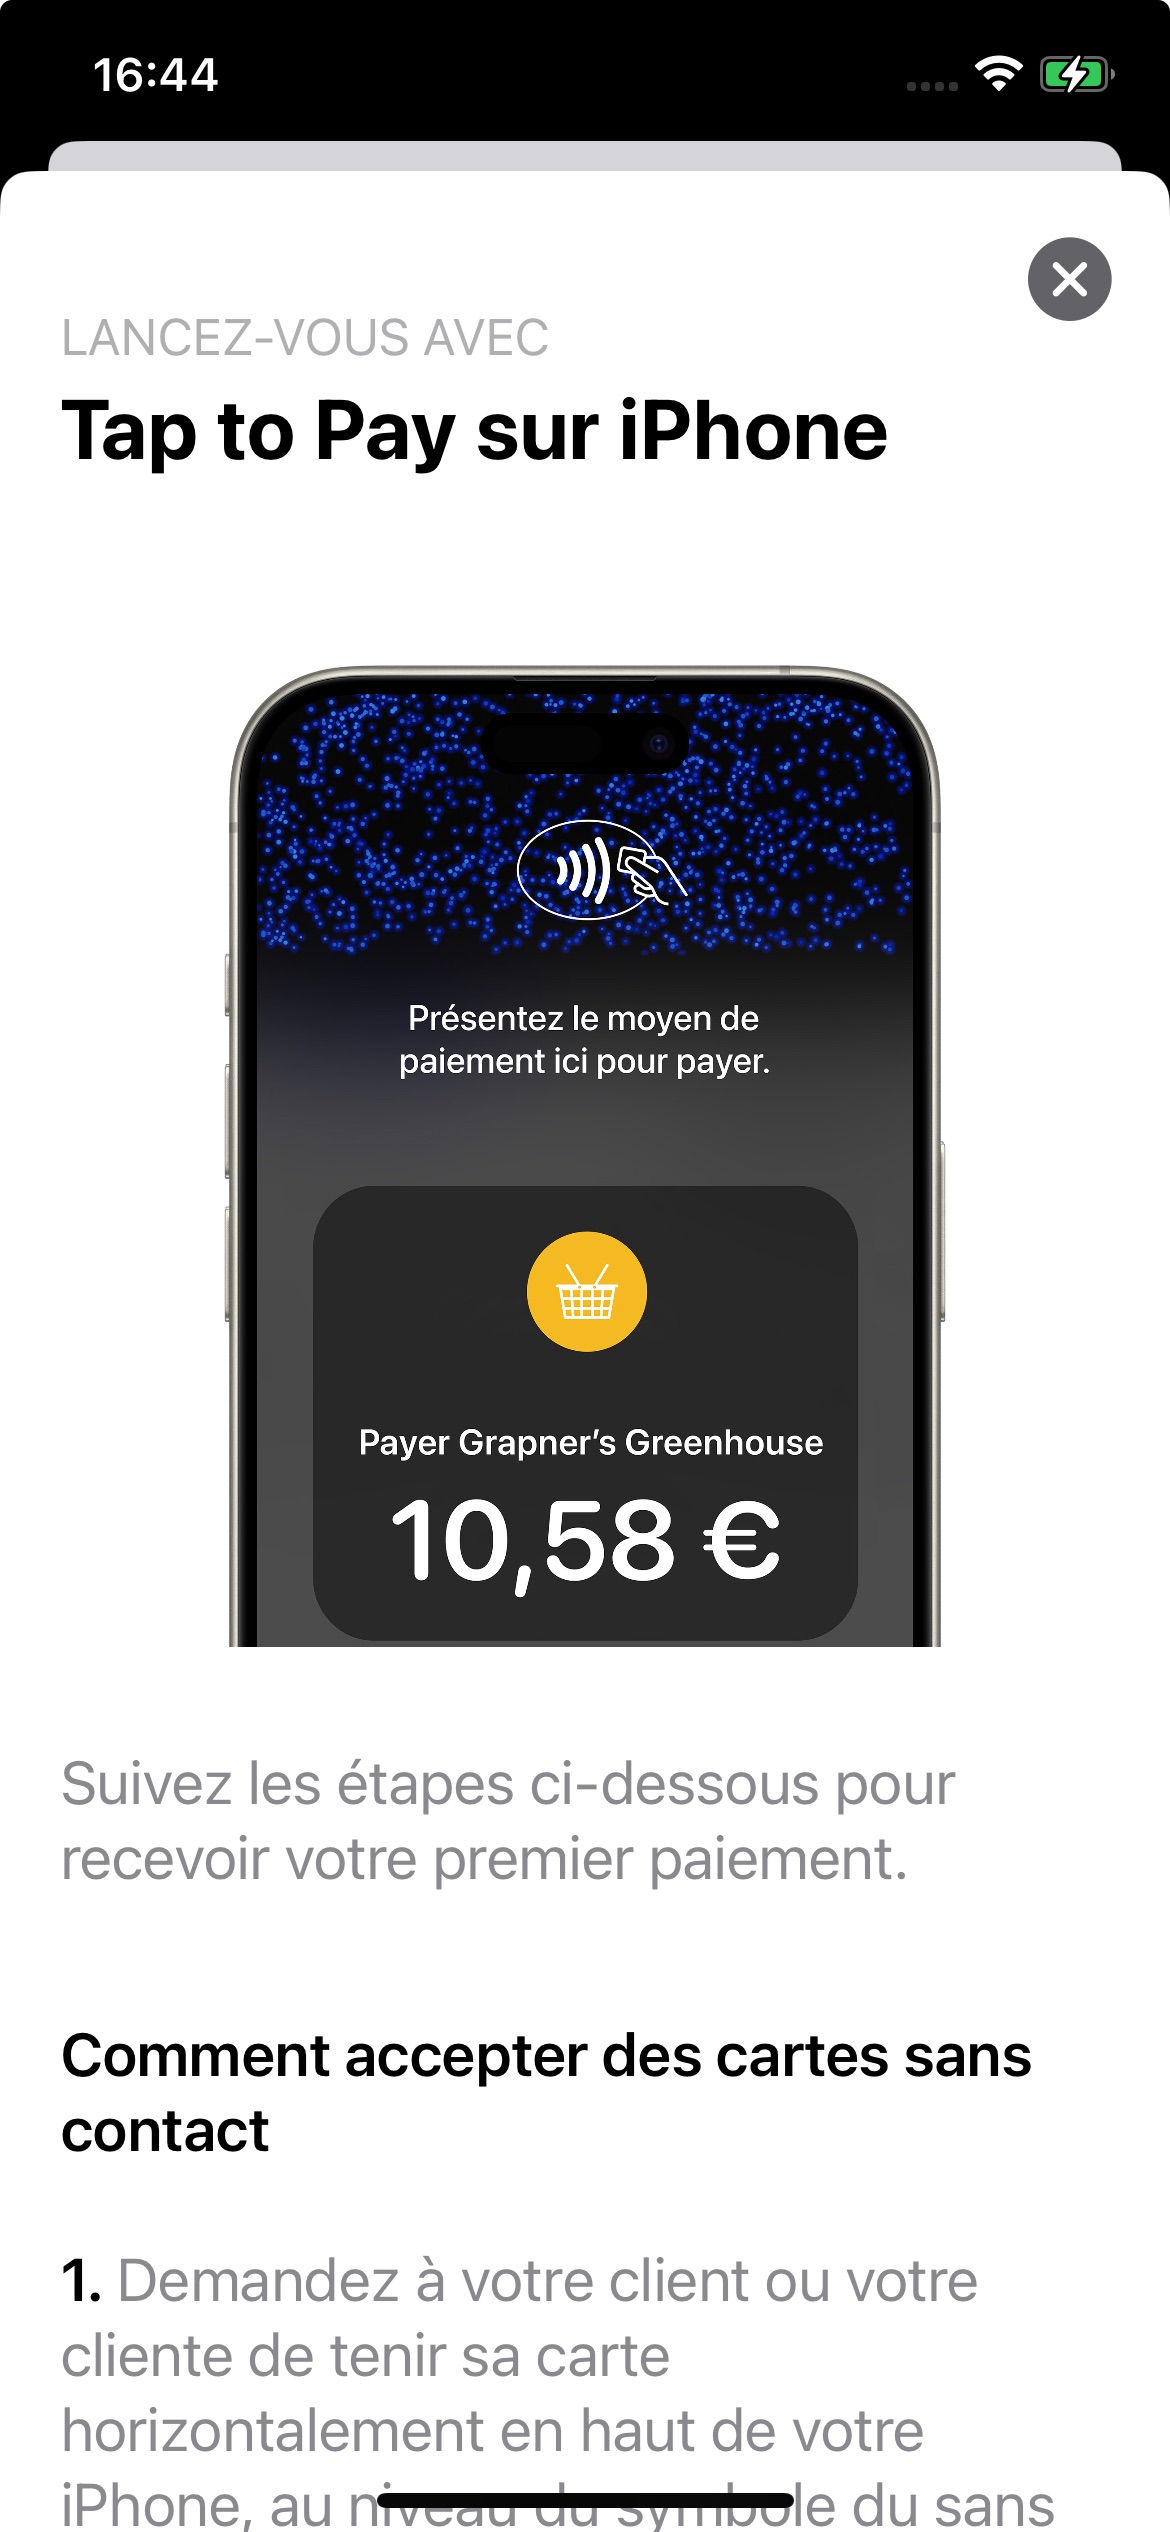
Task {
		await YavinManager.shared.showTapToPayTutorial(viewController: self)
}Prepare ProximityReader
In order to give your users a fluid experience, you need to prepare the proximity reader of the device before a payment (otherwise it may take few seconds before the payment actually starts).
Call prepareProximityReader() ahead of the payment:
The SDK calls this function internally while:
- logging in
- refreshing login
- before payment started
Recommendation: prepare the proximity reader when typing an amount or products to pay.
YavinManager.shared.prepareProximityReader()Data structure
YavinLoginRequest
public struct YavinLoginRequest {
    public let yavinApiKey: String?
}YavinLoginResult
public struct YavinLoginResult {
    public let success: Bool
    public let apiKey: String? // filled when returnApiKey is true
}YavinLoginError
public enum YavinLoginError: Error, Sendable, Hashable {
    case deviceNotEligible(message: String? = nil)
    case invalidCredentials(message: String? = nil)
    case loginYavinFailed(message: String? = nil)
    case loginGatewayFailed(message: String? = nil)
    case refreshLoginForbidden(message: String? = nil)
    case tapToPayDisabled(message: String? = nil)
    case invalidPaymentContract(message: String? = nil)
    case tapToPayTermsNotGranted(message: String? = nil)
}YavinPaymentRequest
public struct YavinPaymentRequest {
    public let amount: Int
    public let transactionType: YavinTransactionType
    public let currency: String
    public let reference: String?
    public let idempotentUuid: String?

    public init(
        amount: Int,
        transactionType: YavinTransactionType,
        currency: String? = "EUR",
        reference: String? = nil,
        idempotentUuid: String? = nil
    ) {
        self.amount = amount
        self.transactionType = transactionType
        self.currency = currency ?? "EUR"
        self.reference = reference
        self.idempotentUuid = idempotentUuid
    }
}YavinPaymentResult
public struct YavinPaymentResult: Hashable {
    public let success: Bool
    public let transactionId: String?
    public let amount: Int
    public let giftAmount: Int
    public let totalAmount: Int
    public let transactionType: YavinTransactionType
    public let currency: String
    public let requiresSignature: Bool
    public let deviceTimestamp: Int?
    public let ticketUrl: String?
    public let issuer: String?
    public let scheme: String?
    public let reference: String?
    public let idempotentUuid: String?
    public let cardToken: String?
    public let paymentApplication: String?
    public let clientTicket: String?
    public let companyTicket: String?
}YavinPaymentError
public enum YavinPaymentError: Error, Sendable {
    case deviceNotEligible(message: String? = nil)
    case notLoggedIn(message: String? = nil)
    case cancelByUser(message: String? = nil)
    case illegalTransactionState(message: String? = nil)
    case paymentFailed(message: String? = nil)
}